Toilet Mug
Design Overview:
This project consisted of:
-
design an object using 3D CAD modeling
-
making sure it was made of 3 or more separate parts and they would be assembled with no external components (glue, tape, screws)
-
3D print the object at the end
I decided to make a mug shaped as a toilet. I thought it would be funny, a good reminder of my ME 1770 class, and I had some good ideas about how to make a 3D model on SOLIDWORKS.

I imagined four different parts which, assembled together, would form my toilet mug: the bowl, the lid, the tank, and the handle.
After discussing with the professor about how to connect the parts, I came to the conclusion that the handle and the tank should be only one part. Also I decided that the way to attach the bowl to the tank/handle, should be a dovetail.
CAD parts
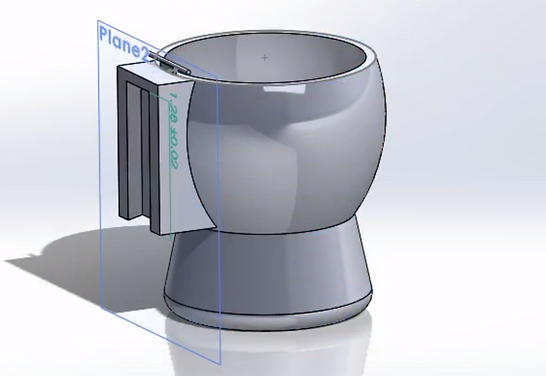
Bowl:
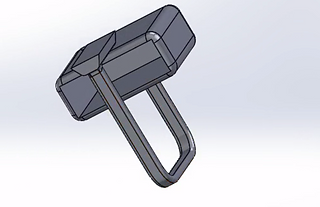
Tank/handle:

Lid:

Interlocking Features
-
Lid and Bowl: There are hinges to connect the lid to the bowl, which would allow the lid to move
-
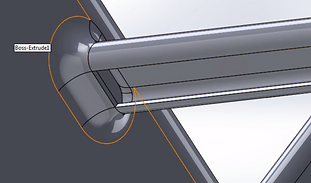
Bowl and Tank: I made a dovetail. It would allow the tank to slide up and connect to the bowl. I also made a boss-extrude to prevent the parts from disconnecting.
Manufacturing considerations
I used a dovetail to make the tank/handle slide up to connect with the back of the bowl. I also made a boss-extrude to prevent the tank/handle from sliding out. I made it with both types of extrusion.
The lid connects to the bowl through a hinge that allows the lid to move in a 90 degrees’ angle, roughly. It could move up to a little bit more than 180 degrees but there is the tank right behind it.
In order to make the parts printable I tried to keep them above a certain thickness, around 0.07 inches. Unfortunately, I ended up doing a shell that I was not supposed to do, which made the handle and the walls of the tank literally paper thin.
The reason why I did that shell was one of the worst problems I had designing the mug. We had to keep the volume at 3 cubic inches or less for the whole assembly. Because of that volume limit I also had to make the mug pretty tiny, it was actually way smaller than an actual mug. In order to make the volume ideal for the guidelines of the project I needed 3 iterations:
-
1st Iteration: I made an extrude cut at the bottom of the tank

tank/ handle model 1
tank/ handle model 2
-
2nd Iteration: I shelled the handle, and accidentally, shelled the inside of the tank as well
tank/ handle model 3

tank/ handle model 3
-
3rd Iteration: Final product
